How to Repair Aquaglide Kickitat: A Comprehensive Guide
Hey there, fellow water sports enthusiasts. Are you tired of dealing with a broken Aquaglide Kickitat? Well, you’re in luck because we’ve got a step-by-step guide on how to repair Aquaglide Kickitat. Whether you’re a seasoned pro or a beginner, this article will walk you through the process of fixing your beloved inflatable kayak.
Understanding the Anatomy of Your Aquaglide Kickitat
Before we dive into the repair process, it’s essential to understand the different parts of your Aquaglide Kickitat. Familiarize yourself with the following components:
- Hull: The main body of the kayak
- Deck: The top surface of the kayak
- Tube: The inflatable part of the kayak
- Valve: The mechanism used to inflate and deflate the kayak
- Footrest: The adjustable platform for your feet
Gathering the Necessary Tools and Materials
To repair your Aquaglide Kickitat, you’ll need the following tools and materials:
- Aquaglide repair kit (available on the manufacturer’s website or Amazon)
- PVC patch kits
- Inflatable adhesive
- Valve wrench
- Tire pressure gauge
- Safety gloves
Pre-Repair Checklist
Before you start the repair process, make sure you’ve:
- Cleaned the affected area with soap and water
- Deflated the kayak completely
- Removed any loose debris or dirt
- Inspected the kayak for any additional damage
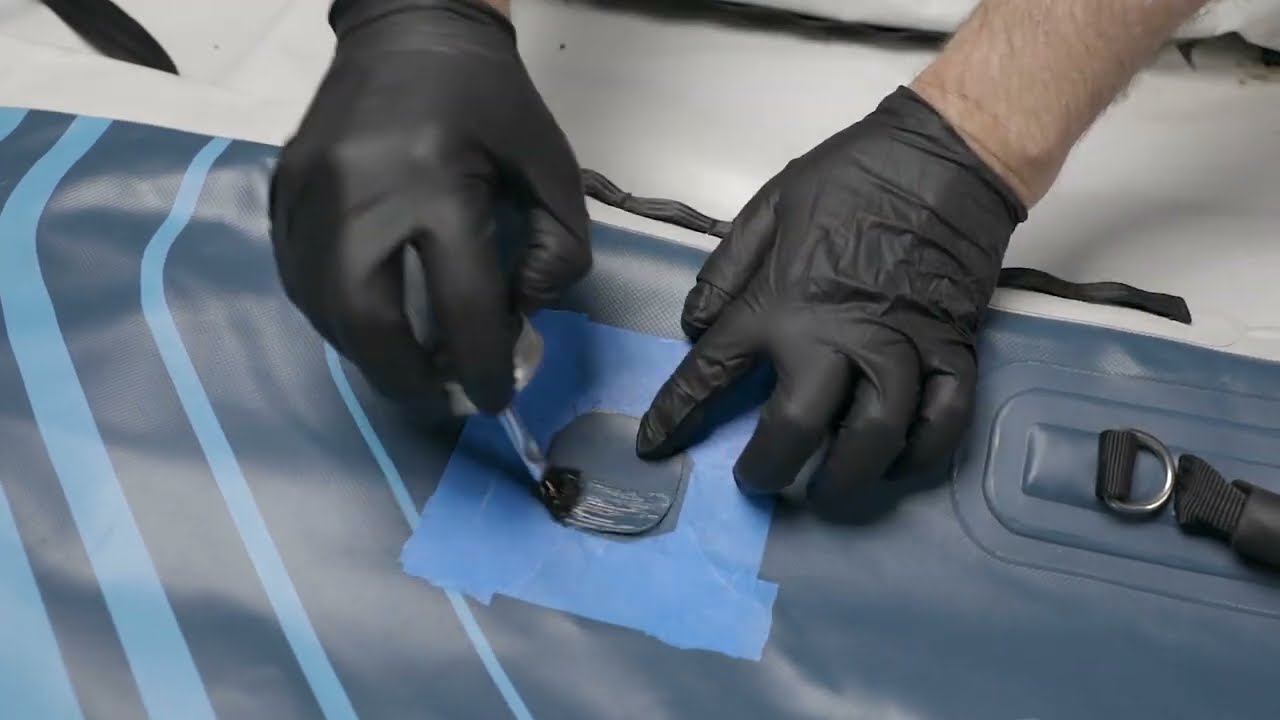
How to Repair a Punctured Tube
A punctured tube is one of the most common issues with inflatable kayaks. Here’s how to repair Aquaglide Kickitat with a punctured tube:
Step 1: Locate the Puncture
Inspect the tube carefully to find the source of the puncture. Mark the area with a piece of tape or a marker.
Step 2: Clean the Area
Use a soft cloth and soap to clean the marked area. Dry it thoroughly with a clean towel.
Step 3: Apply Adhesive
Use the inflatable adhesive to apply a thin layer to the affected area. Make sure to follow the manufacturer’s instructions.
Step 4: Apply the Patch
Take a PVC patch from the repair kit and apply it to the affected area. Press it firmly to ensure it adheres properly.
Step 5: Inspect and Inflate
Inspect the patch to ensure it’s securely attached. Inflate the kayak slowly and check for any leaks.
How to Replace a Valve
A faulty valve can be a real pain. Here’s how to repair Aquaglide Kickitat with a broken valve:
Step 1: Remove the Old Valve
Use a valve wrench to remove the old valve. Be careful not to damage the surrounding area.
Step 2: Inspect the Valve Seat
Inspect the valve seat for any debris or dirt. Clean it thoroughly with soap and water.
Step 3: Install the New Valve
Take the new valve and apply a thin layer of adhesive to the valve seat. Press the valve firmly into place.
Step 4: Secure the Valve
Use the valve wrench to secure the valve in place. Make sure it’s tightened firmly.
How to Fix a Damaged Deck
A damaged deck can be a real eyesore. Here’s how to repair Aquaglide Kickitat with a damaged deck:
Step 1: Clean the Area
Use a soft cloth and soap to clean the affected area. Dry it thoroughly with a clean towel.
Step 2: Apply Adhesive
Use the inflatable adhesive to apply a thin layer to the affected area. Make sure to follow the manufacturer’s instructions.
Step 3: Apply the Patch
Take a PVC patch from the repair kit and apply it to the affected area. Press it firmly to ensure it adheres properly.
Step 4: Inspect and Test
Inspect the patch to ensure it’s securely attached. Test the deck by applying pressure to the affected area.
Additional Tips and Tricks
Here are some additional tips to keep in mind when repairing your Aquaglide Kickitat:
- Always follow the manufacturer’s instructions for repairs
- Use the correct adhesive and materials for your kayak
- Test your kayak after repairs to ensure it’s safe to use
- Consider seeking professional help if you’re unsure about any part of the repair process
Conclusion: How to Repair Aquaglide Kickitat
Repairing your Aquaglide Kickitat can seem like a daunting task, but with the right tools and materials, it’s definitely doable. By following the steps outlined in this article, you’ll be back on the water in no time. Remember to always be patient, take your time, and follow the manufacturer’s instructions. Happy paddling, and don’t forget to share your repair experiences with fellow paddlers! How to Repair Aquaglide Kickitat is not rocket science, but it does require some effort and patience.